Configure TP-Link TL-SC3230 IP Camera for Cloud Recording, Remote Monitoring and Playback
Contents
Step 1: Connect camera to the network and Find IP address
Step 2: Access Camera’s Web-based Configuration Tool
Step 3. Configure the FTP settings
Step 4. Configure Video Profile Settings
Step 5. Configure Event Settings (Event Detection, Schedule)
5.1 Configure Event Detection Settings
Introduction
TP-Link TL_SC3230 is a low-cost 1.3 Megapixel (1280x1024p) wired Video/Audio IP Camera. It has excellent video quality. However, it does not support Wi-Fi, night-vision and cannot upload image snapshots. If you only need day-time video/audio monitoring, or if the scene always has lights on, then it will be a perfect device.
Compared with other IP cameras, this TP-Link model can record .AVI video clips continuously or based on motion detection. Many other IP cameras can only upload video clips based on motion detection.
Basic camera information
| Video / image resolution | 1280x1024, 640x480, 320x240 |
| Audio recording | Supported |
| Image upload frequency | N/A. (Not supported) |
| Video frame rate | ? |
| Night-vision | Not supported |
| Image snapshot recording | Not supported |
| Video clip recording | Supported |
| Motion detection | Supported |
| Continuous recording | Supported |
| Supported video format | .avi |
| Connection type | Ethernet cable |
| PoE (Power on Ethernet) | No |
| Indoor / outdoor | Indoor |
| Lowest pricing (as of 8/1/2015) | $42 |
Note: This document is not designed to replace the product manual from the manufacturer. The information provided is based on our knowledge of the model TP-Link TL-SC3230. It may not be accurate or up-to-date. Users shall contact the manufacturer for all camera-related issues and contact us only for CameraFTP-related (Cloud Service / FTP) issues.
The first two steps below are camera related and are very trivial. If you have finished these basic steps before, then you can skip Steps 1 and 2. CameraFTP’s service can be configured in just 3 steps (i.e. Steps 3, 4 and 5).
Step 1: Connect camera to the network and Find IP address
Power on your camera and connect it with the router using an Ethernet cable. In about one minute, the camera will acquire an IP address through DHCP.
To find the camera’s IP address, you need the manufacturer’s setup program. From a PC in the same network, insert the camera’s software CD, then run the installer. After it is finished, run the installed TP-Link IP Search program, it will launch a tool to search for TP-Link cameras:
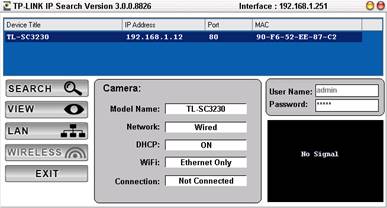
The tool automatically searches for TP-Link cameras in the same network. If it finds a camera, it will display the IP address and port number in the above screen.
Step 2: Access Camera’s Web-based Configuration Tool
Double clicking on the camera’s device title in the IP Search Tool will launch a web browser (Firefox/Chrome is recommended for this camera) and access the Camera’s configuration page at:
http://IP_ADDRESS/ (e.g. http://192.168.1.12)
You can also manually enter the URL with the correct IP address. It will display the live view screen as shown below:
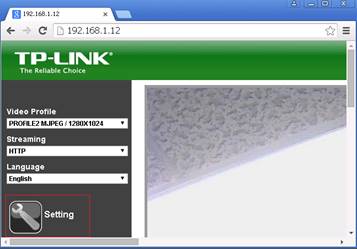
Click the Setting button, it will prompt you to logon:

The default username is: admin, the password is also admin. It is recommended that you change the password.
After logon, you will see the Setup Main screen:
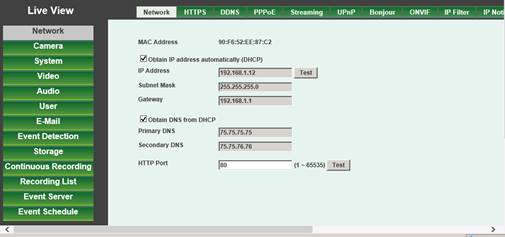
With CameraFTP’s service, most regular setup steps are not required. You can feel free to check these steps, e.g. click System à Date & Time to set the camera time.
Step 3. Configure the FTP settings
Logon to the web-based configuration tool, click Event Server à FTP Server; you will see the screen as shown below. If you don’t have an account on CameraFTP, please visit www.cameraftp.com and sign up for a free trial account. CameraFTP offers three-day free trial. After three days, you need to order our paid subscription to continue using the service.
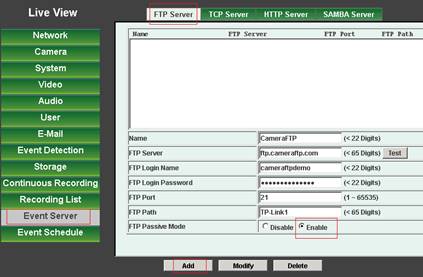
Assuming you already have a CameraFTP Account, then you need to enter the following info:
- Name: Any name, e.g. cameraftp
- FTP server: ftp.cameraftp.com
- FTP Port: 21
- FTP Passive Mode: Enable (This is very important!)
- Username / Password: FTP username is your CameraFTP username, FTP password is available in Configure IP Cameras page. (Your CameraFTP password may also work).
- FTP Path: The camera name you created on www.CameraFTP.com website when you added a new camera.
Click Test to check the settings. If successful, click Add to save the settings.
Step 4. Configure Video Profile Settings
This camera only supports video upload. So if you ordered an image plan, you need to log on to www.cameraftp.com, order a new video plan and cancel the image plan.
If you ordered a video plan, you can click the Video tab à Video Profile as shown below. You only need to configure the Video Profile resolution that matches with your subscription plan. The Rate Control is EVBR. For example, if you ordered 640x480, 5fps video service, then select the video profile3 as shown in the screenshot. Change the quality to 80.
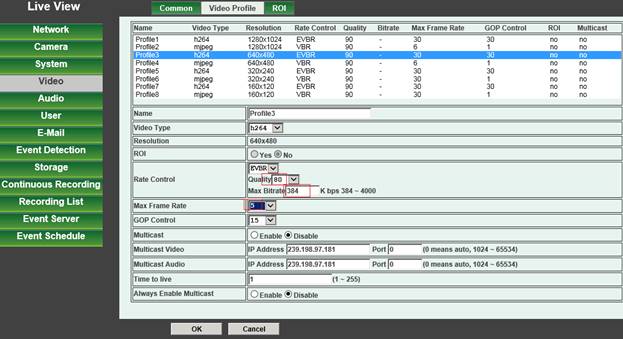
The Max Bitrate is a little tricky. Setting it too high will use too much bandwidth, thus dramatically slow down your network, causing failed uploads; setting it too low will affect the video quality. You can use our bandwidth calculator to estimate the bandwidth. Visit www.cameraftp.com, click Pricing, and then customize a service plan. See the screenshot below.
Note for estimating the bandwidth, Number of Cameras should be set to 1.
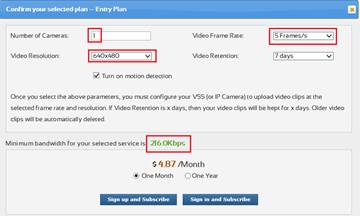
For a video plan of 640x480, 5 frames/s, the estimated bandwidth is 216Kbps. Since this camera does not support bandwidth below 384Kbps, you can set it to the lowest.
Click Ok to save the video profile settings.
Step 5. Configure Event Settings (Event Detection, Schedule)
5.1 Configure Event Detection Settings
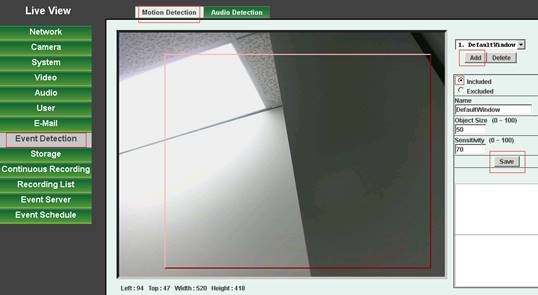
Click Event Detection à Motion Detection; you will see the screen as shown below. Check the “Included” checkbox, enter a name, set Object Size to 5 and Sensitivity to 90, click Add. You can then draw a rectangle in the scene for the motion detection area. (In our testing, this web page is buggy in IE. It is recommended using Firefox). When done, click Save.
5.2 Configure Event Schedule
Click Event Schedule à Setting, you will see the screen below.
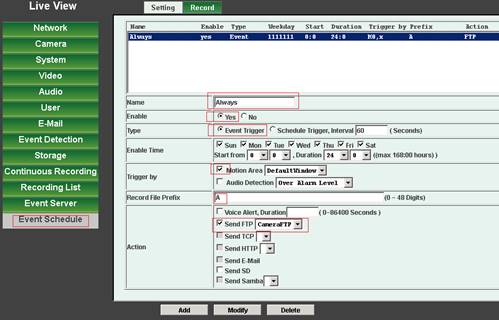
Enter the following values:
- Name: “Always” or any name.
- Enable: Yes.
- Record File Prefix: “A” or any value.
- Action: Send FTP [CameraFTP]
If you ordered a plan with motion detection enabled, then you must check the “Event Trigger” radio button and the “Motion Area” checkbox.
You also need to specify which video profile to record. Click the Record tab as shown below:
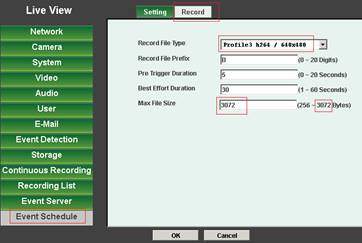
In the “Record File Type” drop-down, select the video profile that we have configured previously. (In this example, Profile3, which is 640x480 and 5 fps).
Note: The Max File Size needs to be changed to 3072,
otherwise, the video clip could be too short. There is a typo in this web page.
3072 means 3072KB, not 3072 Bytes.
Also, if your camera is used to monitor a busy scene such that your camera will be
uploading over 10 hours/day, then you should order a continuous recording plan
even if you enable Motion Detection here, otherwise, your camera might exceed the
usage limit and be blocked
If you ordered a continuous video service plan, you can configure it in Event Schedule à Setting screen as shown below.
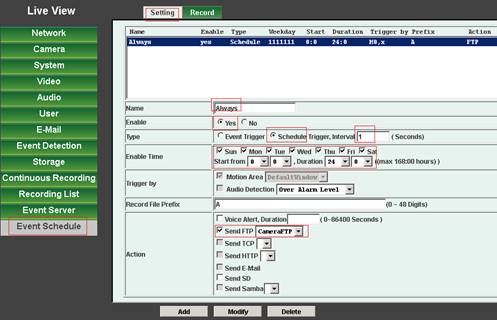
- Name: Enter “Always” or any other name.
- Enable: yes.
- Type: Check the “Schedule trigger, Interval 1 second.”
- Enable Time: Select all days and hours as shown in the above screenshot.
- Record File Prefix: Enter “A” or any prefix.
- Action: Check “Send FTP”, and select CameraFTP.
Click Add (or Modify) to save it. Your camera will upload video clips to CameraFTP with an interval of only 1 second.
The length of each video clip is defined in the following screen: (click Event Schedule à Record)
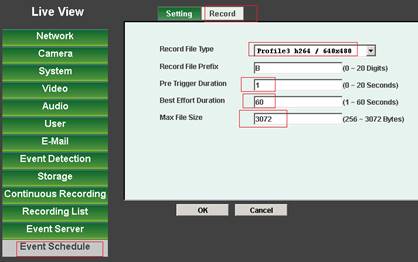
First of all, you need to select the video profile that matches with your CameraFTP subscription
plan. In this example, it is Profile 3 (640x480, 5fps).
For the Record File Prefix, you can enter “B” or any other prefix.
Theoretically, Pre Trigger Duration should be set to 1 since the video interval is only 1 second. The camera sometimes has delays and may miss a few seconds. So you can set the pre-trigger duration to 5 seconds.
Best effort duration is 60 seconds.
Max File Size should be set to 3072 (meaning 3072KB. The web interface has a typo
of 3072 bytes).
Click Ok to save the settings. Your camera will be uploading 60-second video clips
continuously.
Note: once this is setup and if you make changes, you must restart the camera.
You are all done!
6. CameraFTP Viewer
After your camera is setup, you can visit www.cameraftp.com to live monitor or play back your recorded footage from anywhere. You can also download CameraFTP Viewer App for iOS, Android and Windows Phone.
If it is working, you can reboot the camera to make sure it still works after reboot. If you need to make changes, you can run the “IP Search Tool” again to find the camera’s IP address (as it may change), and then access the camera’s configuration page.
Cannot get it to work? Please read our Trouble-shooting Guide.