Configure Mini Wi-Fi IP Cameras for Cloud Recording Nest Cam vs. Alternative IP Cameras
- 1. Introduction
- 1.2 The advantages and disadvantages of Mini Wi-Fi IP Cameras
- 1.3 The advantages and disadvantages of Nest Cam (Drop Cam)
- 2. Configure Mini Wi-Fi IP Cameras to upload images to the cloud
- Step 1: Follow the instructions from the manufacturer and connect the camera to your Wi- Fi network
- Step 2: Configure Camera's Alarm Settings
- Known Limitation and Supported CameraFTP Service Plans
- 3. Configure Mini Wi-Fi IP Cameras to record audio/video clips
- Step 1: Download and install CameraFTP VSS software on your PC.
- Step 2: Search the camera in the local network
- Step 3: Log on to the camera and find the right video stream URL
- Step 4: Configure camera settings based on your subscription plan
- Which subscription plans are compatible with this solution?
- 4. View or download the recorded footage
Introduction
There are many sleek Wi-Fi IP cameras which offer both features and design that is comparable to Nest Cam. These cameras are usually compact and can be easily placed on a shelf or mounted on
a wall. Some of them include magnetic base. They usually support 2-way audio, 720P HD video, wide viewing angle, and require a smartphone for setup and viewing.
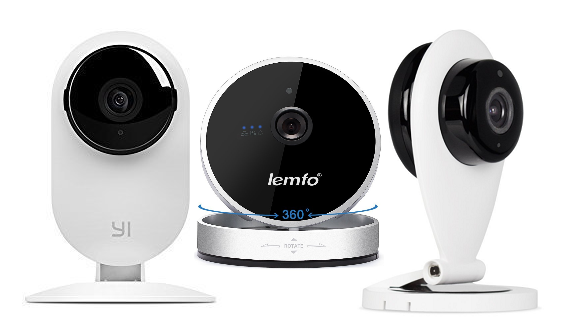
Searching on Amazon or eBay, we can find at least the following models:
- YI Home Camera
- Sricam HD 720P SP009
- LEMFO
- Funlux Mini WiFi Megapixel 720P HD
- iZtouch IZSP-009A
- MiSafes wifi 720p HD
- DBPOWER H.264 1280x720p Home Surveillance Camera Wireless Ip Camera
- COOLEAD 1280x720P HD
- FalconWatch HD
- MVPower Wireless IP Camera HD
- Holan 720P
- Kasonic HD
- PowerLead Pcam
- Zmodo Wireless Mini IP Wifi Camera
- TEQIN S-Pomeranian
- Raynic Raycam
- PowerLead Pcam WIFI 720P
- UOKOO 1280x720p Home Surveillance Camera
- EZVIZ Mini HD 720p WiFi Home Security Camera
- Zmodo ZM-SH721 720p HD Mini Wi-Fi Network IP Camera
- Sokos 720P P2P Wireless Wifi Home Security IP Camera
- Pyle PIPCAMHD22WT HD 720p Wireless Remote Surveillance Camera
Mini Wi-Fi IP Cameras are easy and cool. Like Nest Cam, they lack advanced features. As the leading Cloud Surveillance and Recording service provider, one major advantage of our service is we can support almost all IP cameras, unless the camera vendor locked the camera with a specific (e.g. their own) cloud service. CameraFTP is probably the only cloud surveillance and recording service provider that can support these cameras. On the other hand, Nest Cam is completely proprietary; it does not support any open IP camera standards and can only work with Nest's own service.
1.2 The advantages and disadvantages of Mini Wi-Fi Cameras
The Advantages:
In general, mini Wi-Fi IP cameras are competitive due to their sleek design, decent video quality and low price. But like Nest Cam, they also have a few major issues. If you have not already bought a camera, you might want to check the advantages and disadvantages of these cameras before you purchase one. If you have already bought one, luckily, CameraFTP can offer cloud recording service. (We are likely to be the only one as the camera does not support any other conventional way of uploading to the cloud.)
The Disadvantages:
- They lack browser based interface and can only be viewed from a smart phone;
- They have a very weak management interface. They don't support FTP, making it very hard for cloud recording. They also don't allow creating different video profiles to balance video quality and bandwidth usage;
- They only support Wi-Fi. In certain cases, Wi-Fi may not be as reliable as a wired connection.
- You must install an app on your smart phone to configure the camera. The app is from a not-well-known manufacturer in China and you must sign up an account with them.
2. Configure Mini Wi-Fi Cameras to upload images to the cloud
Due to the extremely weak firmware and management interface, these cameras cannot upload video clips to the cloud directly. They don't even support FTP. However, they can email an image when it detects a motion. Moreover, the Settings screen does not allow you to specify image resolution, upload frequency and number of images to upload when it detects a motion. Therefore, if you want to upload images directly to the cloud, you can only upload 1 image/minute, at 640x360 with motion detection enabled. On CameraFTP, such a plan costs $1.50/month. If you order annually, you can save 2 months for only $15/year.
Step 1: Follow the instructions from the manufacturer and connect the camera to your Wi-Fi network.
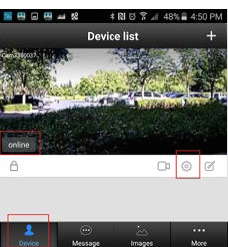
Many Mini Wi-Fi IP Camera manufacturers have done a terrible job of documenting their cameras. We hope the documentation below can offer some general information about how to configure these cameras. First of all, you need to download the manufacturer's Mobile App. It is better if you download the iOS version instead of the Android version. (Downloading an app from a less well-known company is a little risky. Fortunately, iOS does a better job in limiting what a malicious app can do.) Interestingly, the apps seem to be powered by the same technology provider. There are a few apps such as YooSee, FunLux, MeShare and Cot Pro. They all look very similar feature-wise. After you install the App, launch it, and then follow the instructions to connect your camera to your Wi-Fi access point. Some cameras might support "AP" mode, which means the camera will act as a Wi-Fi Access Point. Please don't select this mode as you want the camera to connect to the Internet. If your camera is connected to your Wi-Fi Access Point, you can then add your camera to this app. You can add the camera by the camera ID (or name), or the app usually can search the network and find the camera. To successfully add the camera, you need the camera's default username and password. After you have added the camera, you can then see your camera in the device list as shown in the screenshot to the right:
Step 2: Configure Camera's Alarm Settings
Click the Device tab, and make sure your camera is online. In order for the camera to directly upload images to the cloud, please ensure the lock icon is showing as "locked". Then tap the Settings icon. You will see the following screen:
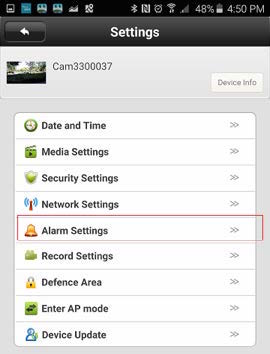
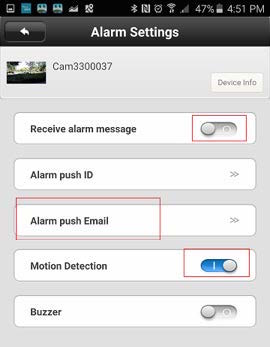
Select 'Alarm Settings', and you will be brought to the next screen. In this screen, you must turn on Motion Detection.
We recommend turning off "Receive Alarm Message" and "Buzzer", otherwise, your phone might receive too many alarms, pretty annoying. The advantage of CameraFTP's service is we record the alarm scene in the cloud, thus protecting the evidence in the cloud.
Tap on "Alarm Push Email", you will see the Modify Email screen. Tap on "Manual Setting", you will then be able to enter CameraFTP info as follows:
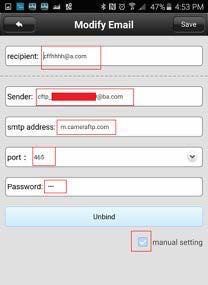
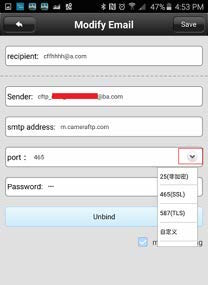
Here the email recipient will be ignored; the attached images will be saved in your CameraFTP account automatically. You can enter any email address as the recipient. The email address does not need to be real, but must be in a valid email address format, e.g.: abc@abc.com.
The Sender email must be in the format of: cftp_USERNAME_CameraFolderID@ANY_DOMAIN.com
- USERNAME : your CameraFTP account username. These cameras limit the email address length to only 32 characters. You only need to use the first 3 letters of your username. CamreaFolderID: You can find it in your Edit Camera page on www.CameraFTP.com.
- ANY_DOMAIN: any domain name. Does not need to be real. You can simply use a.com or ab.com.
- Smtp address: cftpMailUploader.drivehq.com or c.drivehq.com
- Port: 465 (in certain cases, you can also try Port 25, or 587)
- Password: your CameraFTP password.
- Certain cameras allow you to enter a username. If so, please enter cftp_USERNAME_CameraFolderID.
- After you entered the correct info, tap Save to save the information.
That's all. If you want to temporarily stop the camera from uploading to the cloud, you can tap the Lock icon in the device list screen to "unlock" it. If the icon status is "unlocked", then it will not upload data to the cloud. Otherwise, it will upload an image to the cloud once it detects a motion.
Known Limitation and Supported CameraFTP Service Plans
Unfortunately these cameras' firmware is very weak. It cannot upload multiple images for one alarm; it cannot specify image resolution or upload frequency. In the case of continuous motion, it can upload one image per minute at 640x360. If it is not good enough for you, you can consider using CameraFTP's Virtual Security System (VSS) solution. VSS can connect to the camera's video stream, encode the video/audio into .mp4 video clips and upload the data to CameraFTP cloud storage.
With the above image recording method, you can only configure the camera for the following service plans:
- Image Recording service;
- Motion detection enabled;
- 640x480 image resolution;
- 1 image/minute.
- You can choose any retention period. If you choose 7-day or 30-day retention period, the monthly service price is only $1.50!
Configure Mini Wi-Fi IP Cameras to record audio/video clips
As mentioned, these cameras' firmware is very limited. It cannot upload video/audio to the cloud. Fortunately, the camera is compatible with CameraFTP's Virtual Security System (VSS) software. Using VSS, you can record video / audio clips to the cloud.
Step 1: Download and install CameraFTP VSS software on your PC
You can visit CameraFTP and click on the Software tab to download CameraFTP VSS. After installing the software, launch it and logon using your CameraFTP username and password.
Step 2: Search the camera in the local network
Click the Add button to add a camera. You will see the following screen
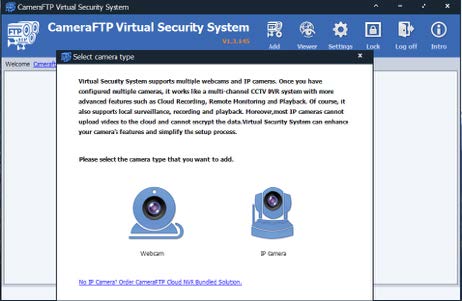
Click "IP Camera", and make sure your camera and your PC are connected to the same Wi-Fi Access Point. Then Click Ok to confirm, VSS will start scanning the network for IP cameras. After it finishes, it will display a list of IP cameras in the network.
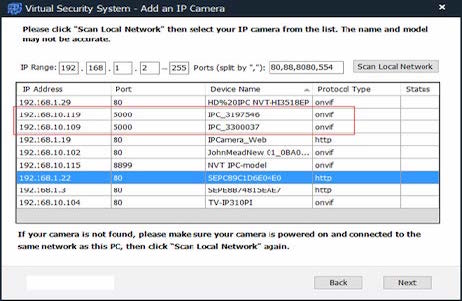
In the above screenshot, VSS found 2 such cameras.
Step 3: Logon to the camera and find the right video stream URL
Select a camera that you want to add and click Next.
You will be asked to provide the username and password to log on to the camera. Please note your camera's username and password is different from your CameraFTP username and password. For better security, it is strongly recommended that you change your camera's default password.
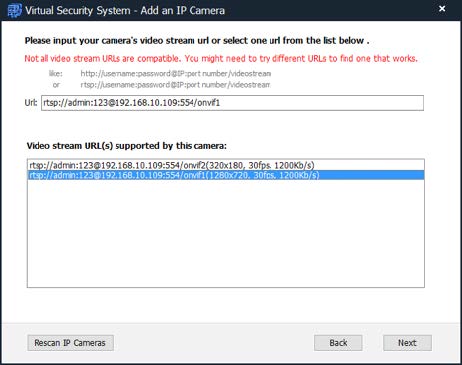
If you provide the correct username and password, then click Next, VSS will use ONVIF protocol to find the camera's video stream URLs. In a few seconds, it will display a list of video stream URLs (see screenshot)
These cameras usually can support 3 different video resolutions: 320x180, 640x360 and 1280x720. In the above list, there are only 2 resolutions. You can use the manufacturer's mobile app to change the video size to SD (640x360), HD (1280x720) or LD (320x180).
Select a video stream URL based on your CameraFTP subscription, then click Next. VSS will display a message box "Successfully connected to the IP camera".
Step 4: Configure camera settings based on your subscription plan
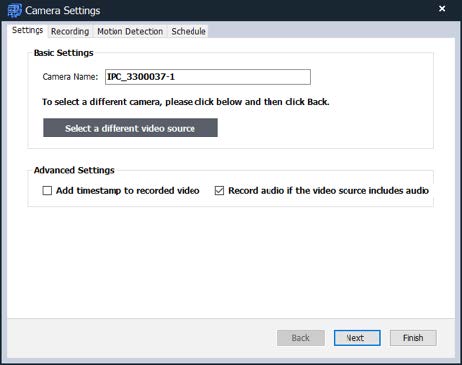
Click OK to continue and you will see the page to the right
You can change the camera name to a more friendly name such as a LivingRoom. By default, VSS wil include audio in the recorded video files. If you don't want audio to be recorded, just uncheck the checkbox. You can optionally check the checkbox Add timestamp to recorded video
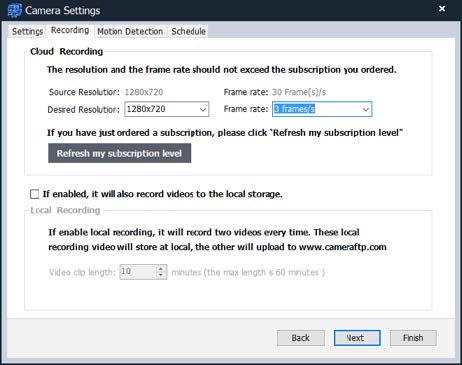
Select the correct video resolution and frame rate based on your subscription plan(s). Click Next.
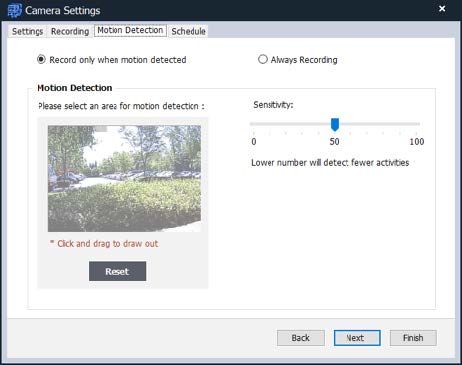
You can select whether VSS should record the video continuously or based on motion detection. The setting must match with your subscription plan. We usually recommend motion detection as it can lower your service cost and reduce your bandwidth usage. If you choose motion detection, you can also specify the detection area by drawing a rectangle on the preview image. Click Next again to the Schedule screen:
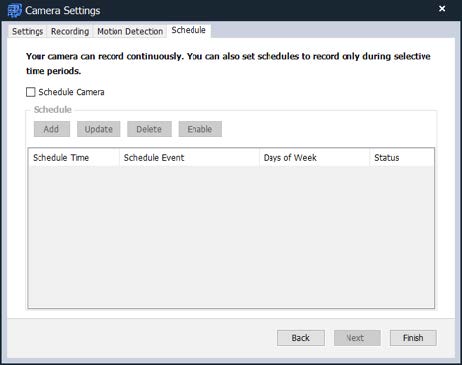
If you don't want your camera to be recording all the time, you can specify when the camera should be recording. Otherwise, you can just click Finish.
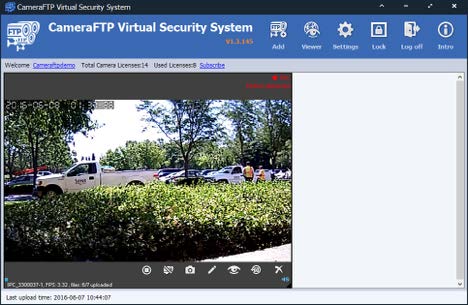
VSS will add the camera and display the live view window as shown above.
Which subscription plans are compatible with this solution?
The camera's firmware only allows selecting 3 different video sizes (320x180, 640x360 and 1280x720); the video frame rate is not changeable at roughly 10 to 20 fps. With CameraFTP VSS, your service plan can be far more flexible. In addition to the 3 video sizes, you can also select any video size smaller than 1280x720, and any video frame rates from 1 fps to 20 fps. If you select HD 720P video at high fps, please make sure your wi-fi signal is strong and you have a very fast Internet connection. To reduce wi-fi congestion, if your PC has an Ethernet port, please use wired connection instead of wi-fi connection.
VSS supports both continuous recording and motion-triggered recording. The motion detection handled by VSS is independent of the camera's motion detection.
4. View or download the recorded footage
To view the recorded footage online, you can install CameraFTP Viewer app for iOS, Android, Windows 8, and Windows 10, or use our browser-based viewer by logging on www.CameraFTP.com website.
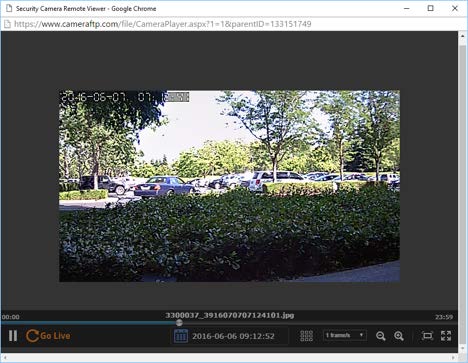
To download the recorded footage, you can install any FTP client software such as FileZilla. You can download any number of files / folders at once.
Microsoft's Windows Explorer (not a web browser) can also be used as a simple FTP client. Just enter the following FTP address:
ftp://USERNAME@ftp.cameraftp.com/
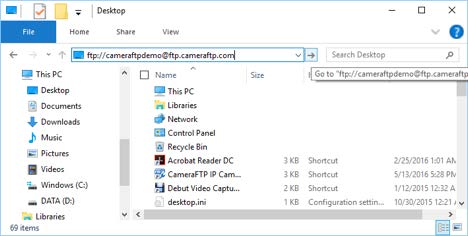
Press ENTER, it will pop up a logon dialog. Enter your CameraFTP password, optionally check "Save password", and then click "Log On".
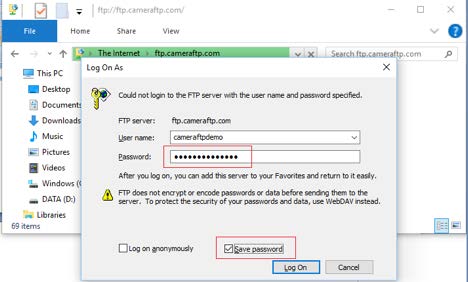
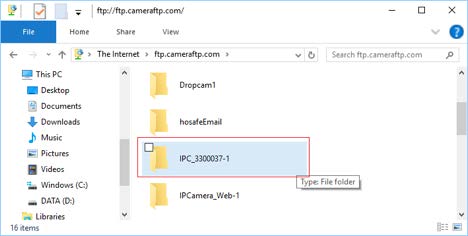
The newly created camera folder is shown below. Double click on the folder name, you will see a list of video clips uploaded by VSS. You can download files or folders using drag and drop.
