Configure Foscam C1, C1 Lite or C2W IP Camera for Cloud Recording, Remote Monitoring and Playback
Contents
Step 1: Connect camera to the network and find IP address
1.1 Connect camera to the network
1.2 Find the Camera’s IP Address
Step 2: Configure the Camera Using the Web-based Configuration Tool
2.1 Setup or Re-configure Wi-Fi
Step 3. Configure the FTP settings
Step 4. Configure Video or Image Snapshot Settings
4.1 Configure Video / Image Settings (Resolution, Frame Rate, Bit Rate)
4.2 Configure Image Snapshot Settings
4.3 Configure alarm recording for both image and video recording
4.4 Configure continuous (or scheduled) video recording
5. Configure Alarm / Motion Detection Settings
Introduction
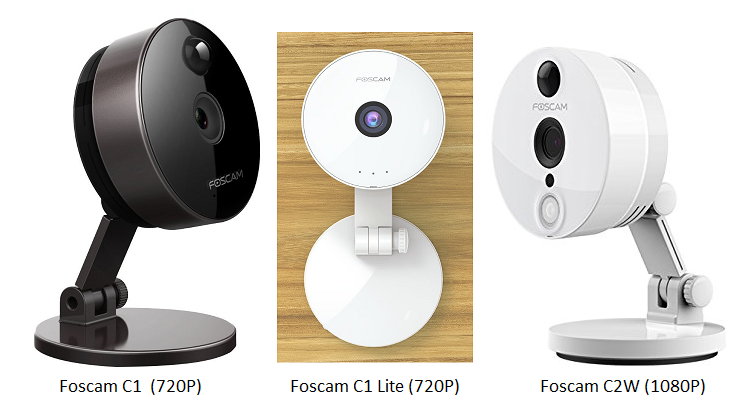
Foscam C1 is a 720P (1280x720p) H.264 Wired & Wireless IP Camera with night-vision of up to 24 feet. Foscam C1 Lite is very similar to C1, except it is Wi-Fi only and does not support night-vision. Foscam C2W is an upgrade of C1 model with 1080P (1920x1080) video resolution. It also supports wired & wireless connection and night-vision. These cameras have great features and excellent video / image quality, and with wide viewing angle of 100 to 120 degrees.
Foscam cameras use a less popular video format of .mkv, which cannot be played in some web browsers. Currently, CameraFTP.com supports playing Foscam .MKV video clips in Internet Explorer only. In addition, CameraFTP Viewer apps for Android and iOS both support .MKV. You can install the viewer app or download the video clips to your PC and play them locally using VLC Player or Windows Media Player.
Basic camera information
| Video / image resolution | 1280x720, 640x360, 320x180. (1920x1080P for C2W) |
| Audio recording | Supported |
| Image upload frequency | 1 image/s to 1 image/5s |
| Video frame rate | 1,2,3,...,30 fps |
| Night-vision | Up to 24 feet. (not C1 Lite) |
| Image snapshot recording | Supported |
| Video clip recording | Supported. |
| Motion detection | Supported for both image and video clip based recording |
| Continuous recording | Continuous recording is supported, but each video clip is 2-hour long, making it not ideal for real-time monitoring. |
| Supported video format | .MKV (Requires Internet Explorer, or you can download the video files and play locally using VLC Player, Windows Media Player, or use CameraFTP Viewer app for Android / iOS) |
| Connection type | Wi-Fi and Ethernet cable; supports WPS |
| PoE (Power on Ethernet) | No |
| Indoor / outdoor | Indoor |
| Lowest pricing (as of 6/15/2016) | $59.99 ($99.99 for C2W) |
Note: This document is not designed to replace the product manual from the manufacturer. The information provided is based on our knowledge of the model Foscam C1, C1 Lite and C2W. It may not be accurate or completely up-to-date. Users shall contact the manufacturer for all camera-related issues and contact us only for CameraFTP-related (cloud service / FTP) issues.
Most of the setup steps below are camera related and are very trivial. If you have finished these basic steps before, then you can skip Steps 1 and 2.
Step 1: Connect camera to the network and find IP address
1.1 Connect camera to the network
There are 2 or 3 ways to connect the IP camera to the Wi-Fi network. Please read the product manual for detailed instructions.
(1) If your Wi-Fi router does not support WPS, then you can connect the camera with the router using an Ethernet cable first. You can configure the Wi-Fi settings in the camera's configuration pages later. This method works for Foscam C1 and C2W. The C1 Lite model does not support wired connection. You can use manufacturer's app to connect it to the network.
(2) If your Wi-Fi access point/router supports WPS, then it is very easy to connect your device to the network.
Turn on the camera and press the WPS button on your Wi-Fi access point (router) for 3 seconds; the WPS button will usually start flashing. Next, quickly press the WPS button on your camera. In about 1 minute, you will see the network light (above the red power light) change to slow flashing green, indicating it is connected to the wireless router.
Foscam C1 and C2W can automatically disconnect Wi-Fi when you connect a network cable and it will keep the same IP address; and if you unplug the Ethernet cable, Wi-Fi will be re-enabled and keep the same IP address.
1.2 Find the Camera’s IP Address
Please refer to the manufacturer’s manual for more detailed information. Usually you will run the included IP Camera Search Tool to find the camera. If your computer does not have a DVD/CD drive, then you can use CameraFTP VSS software or CameraFTP Camera Configuration Tool to find the camera's IP address (without using other cloud recording features).
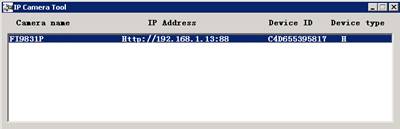
If your camera is connected to the Wi-Fi router, or if you have connected the camera with a router using an Ethernet cable, you can run the manufacturer’s setup program to find the camera’s IP address. From a PC in the same network, insert the camera’s software CD. Browse the content of the CD and run IPCamSetup.exe, it will install the necessary software for the camera. After it is finished, run the installed IP Camera Tool and it will launch a tool to detect Foscam cameras:
Step 2: Configure the Camera Using the Web-based Configuration Tool
Double clicking on the camera name in the IP Camera Tool will launch a web browser (IE or Firefox is recommended for this camera. The activeX / plug-in does not work in Chrome) and access the Camera’s configuration page at:
http://IP_ADDRESS:PORT_NUMBER/(e.g. http://192.168.1.13:88)
(You can also manually enter the URL with the correct IP address and Port number):
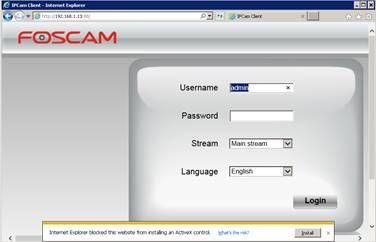
The default username is: admin, the password is blank. (It is recommended that you change the password.)
Try to install the ActiveX/Plug-in. Foscam’s old version ActiveX / Plug-in does not work. You can fix the problem with a firmware upgrade. So if you cannot install ActiveX/Plug-in, you can ignore it for now and upgrade the firmware later. After you log on with a blank password, it will ask you to change your username and password:
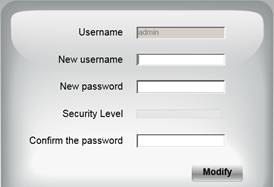
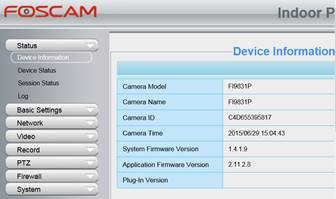
Enter a new username (e.g. newadmin), new password and confirm the password, then click Modify. You are then required to log on again with the new username and password. After logon, you will see the Setup Main screen:
With CameraFTP’s service, most regular setup steps are not required. (You can check these steps, e.g. click Basic Settings à Camera Time to set the camera time.)
2.1 Setup or Re-configure Wi-Fi
If you had already connected the camera with your wireless router, then skip this step.
Otherwise, click the Network tab, then click Wireless Setup, you will see the screen below.
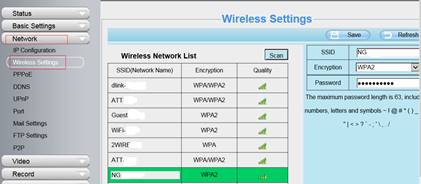
Click Scan to find all available Wi-Fi routers, then select your connection. Enter the wireless password, after done, click Save.
If Wi-Fi is configured successfully, you can unplug your network cable later.
Step 3. Configure the FTP settings
Click Network à FTP Settings, you can see the screen as follows. If you don’t have an account on CameraFTP, please visit www.cameraftp.com and sign up a free trial account. CameraFTP offers 3-day free trial. When the trial is up, you will need to order a subscription to continue using the service.
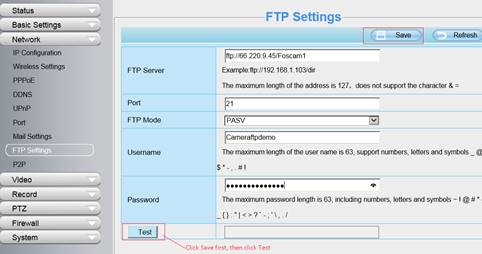
Assuming you already have a CameraFTP Account, then you need to enter the following info:
- FTP Server: ftp://66.220.9.45/Foscam1
- Port: 21
- FTP Mode: PASV (This is very important!)
- Username / Password: FTP username is your CameraFTP username, FTP password is available in Configure IP Cameras page. (Your CameraFTP password may also work).
Note: Unlike most other IP cameras, this Foscam model does not support a parameter of Folder, Directory or Path. The folder name is included in the FTP server parameter. In the above screenshot, “Foscam1” is the folder name, which is the same as the camera name that you created on www.CameraFTP.com website when you added a new camera.
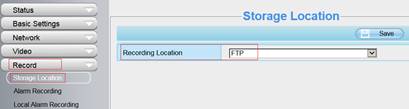
Click Save to save the settings. After that, you need to configure the storage location for FTP. In the Record tab, click “Storage Location”, then set the location to FTP. See the screenshot below.
Step 4. Configure Video or Image Snapshot Settings
Based on your subscription, you only need to configure video settings or image snapshot settings. You shall not configure both settings, otherwise, you need to order two separate camera licenses.
4.1 Configure Video / Image Settings (Resolution, Frame Rate, Bit Rate)
If you ordered a video plan, then you can click the Video tab à Video Settings as shown below. (Otherwise, please skip this step). You only need to configure the Main Stream Video Settings.
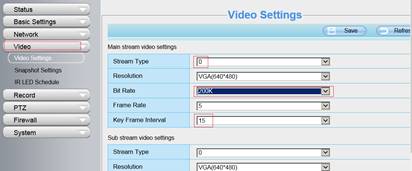
With the latest BIOS version 1.4.1.10 (or higher), the screen is slightly different:
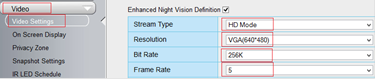
Set the stream type to 0 or HD mode;
The resolution and frame rate should be based on the plan you subscribed to;
Key Frame Interval is usually set to be 2 or 3 times of the frame rate, but not less than 5;
The Bit Rate is a little tricky. Setting it too high will use too much bandwidth, thus dramatically slow down your network, causing failed uploads; setting it too low will affect the video quality. You can use our bandwidth calculator to estimate the bandwidth. Visit www.cameraftp.com, click Pricing, and then customize a service plan. See the screenshot below.
Note for estimating the bandwidth, Number of Cameras should be set to 1.
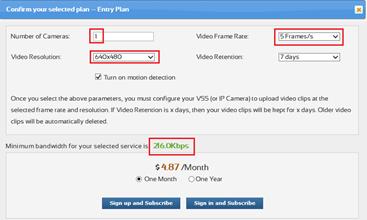
For the video plan of 640x480, 5 frames/s, the estimated bandwidth is 216Kbps. Usually you can set it to 200Kbps or 256Kbps. However, the MKV compression ratio seems to be not as high as MP4. If you see some 0-byte .MKV files, you need to increase the Bit Rate (e.g. to 512Kbps).
If you ordered an image plan, then you only need to select the correct video resolution. The resolution of the image snapshots will be the same as the Main Stream video.
Click Save to save the video settings.
4.2 Configure Image Snapshot Settings
If you ordered an image plan, then you should configure Image Snapshot Settings. (Otherwise, skip this step). Click on the Video tab à “Snapshot Settings”, you will see the screen as follows.
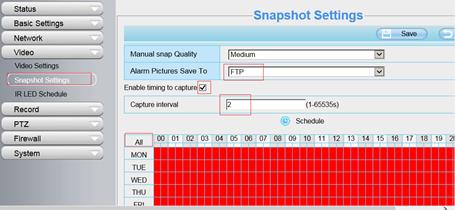
- Alarm Picture Save to: Set it to FTP.
- Enable Timing to capture: If you ordered a plan with continuous recording, you can check the checkbox, then click All to select all time slots.
If your subscription is for 1 image/2 seconds, then enter 2 in the “Capture Interval” field.
If you ordered a plan with motion detection enabled, please read further below.
4.3 Configure alarm recording for both image and video recording
Click the Record tab à Alarm Recording as shown below.

The default parameters are usually fine. So just click Save.
4.4 Configure continuous (or scheduled) video recording
If you ordered an image plan, or a video plan with alarm recording, you can skip this step.
Otherwise, click the Record tab à Scheduled Recording, you will see the screen as follows.
Assume you ordered a continuous video service plan, you can enable the checkbox of “Enable Scheduled Recording”, then click All to select all time slots.
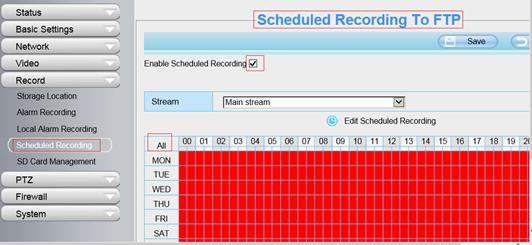
Click Save to save the change. Your camera will upload video clips to CameraFTP continuously. This camera will record 2 hours of video in each clip file, making it not idea for real-time monitoring. If you need real-time monitoring, please use our image service or motion detection-based video service.
NOTE: Please do not configure both video service and image service. It will be considered as two camera licenses!
5. Configure Alarm / Motion Detection Settings
With the latest firmware, Foscam finally brought the much-needed motion detection feature. You can check your firmware version. The version we tested is 1.4.1.10 as shown below:
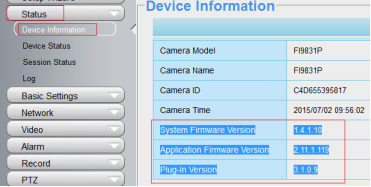
If you have an older version firmware, you need to follow the device's manual, visit Foscam website to download the latest version firmware, and upgrade the camera's firmware. Please make sure you connect your camera with the router using an Ethernet cable for firmware upgrade. For more info/support, please contact Foscam directly.
Click Alarm à Motion Detection, you will see the following screen.
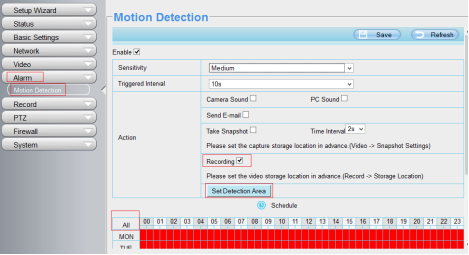
If you ordered a video plan with motion detection enabled, then you need to:
- Check "Enable" checkbox and "Recording" checkbox.
- Click "Set Detection Area" to draw a motion detection area. Note: This is a required step for motion detection. After done, click Ok.
- Click "All" to enable motion detection at all times. Otherwise, select the time slots that motion detection should be turned on.
Click Save to save the settings. The camera will record video clips based on motion detection.
If you ordered an image plan with motion detection enabled, then you need to:
- Check "Enable" checkbox and "Take snapshot" checkbox.
- Select a Time Interval based on your subscription. E.g. if you ordered a plan with upload frequency of 1 image/2 seconds, then select 2s.
- Click "Set Detection Area" to draw a motion detection area. After done, click Ok.
- Click "All" to enable motion detection at all times. Otherwise, select the time slots that motion detection should be turned on.
Please note snapshot settings should have been configured as follows.
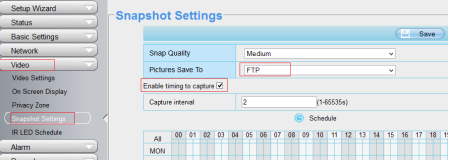
Note: It is quite odd why you must check "Enable timing to capture". In our testing with this camera, it is required for motion detection-based image service. To avoid the camera from uploading snapshots continuously, you must not select any time slots.
Click Save. Your camera will be uploading image snapshots to CameraFTP. The resolution of the image is defined in your video setting.
You are all done!
Note: Please do not check both "Take snapshots" and "Recording" in the Motion Detection screen. It will be considered two separate camera licenses.
6. CameraFTP Viewer
You can disconnect the Ethernet cable if you want to use Wi-Fi. If you need to make changes, you can run the setup program again to find the camera’s IP address (as it may change with DHCP), and then access the camera’s Configuration pages.
After your camera is setup, you can visit www.cameraftp.com to live monitor or play back your recorded footage from anywhere. You can also download CameraFTP Viewer App for iOS, Android and Windows Phone.
Cannot get it to work? Please read our Trouble-shooting Guide.