Configure HikVision Network Cameras with Firmware V5.8.4 Build 240613 (June 2024 firmware) for Cloud Recording, Backup, Monitoring and Playback
Contents
Step 1: Connect the camera to the network and find its IP address
Step 2. Access the Camera's Web-based Configuration Tool
Step 3. Configure the video stream profile
Step 4. Configure FTP Settings
Step 5. Configure Motion Detection and Snapshots
5.1 Configure Motion Detection
5.2 Configure Image Snapshot Settings
Step 6. NVR Configuration and CameraFTP Viewer
This Setup Guide Document is for Hikvision cameras with Firmware V5.8.4 Build 240613.
Hikvision is one of the largest security camera manufacturers. They have many camera/DVR models.
Many of their cameras are designed for out-door use. They support image/video resolutions of
2048x1536, 1920x1080, 1280x720, 640x480 and up to 8MP (4K) resolutions.
Most of Hikvision cameras and NVRs can upload or back up image snapshots to a cloud FTP server.
It is perfect for image recording or timelapse recording.
Most of Hikvision cameras / NVRs are compatible with CameraFTP VSS.
CameraFTP VSS software can use a PC as a powerful CCTV NVR system.
It can connect to Hikvision IP camera/NVR's video streams, display the live videos on your PC screen while storing video footage to the cloud or local drive.
 |
 |
 |
| Hikvision_DS-2CD1383G2-LIUF, 8MP PoE network camera |
Hikvision NVR with network cameras |
Hikvision_DS-2CD2085G1-I, 8MP network camera |
Basic camera information
Hikvision Firmware V5.8.4 Build 240613 has changed the device's configuration interface significantly.
It now supports uploading low-resolution (640x480) images using the Sub-Stream video resolution.
However, the main features and steps remain similar to older version firmware (or older model devices)
| Video / image resolution |
3MP, 4MP, 6MP, 8MP (4K), 1920x1080 and 1280x720 dependent on the camera model |
| Audio recording |
Yes |
| Image upload frequency |
1 image/s - 1 image/7 days |
| Video frame rate |
12.5fps |
| Night-vision |
Up to 100 feet for outdoor models |
| Image/Timelapse recording |
Yes. 1 image/s - 1 images/7 days |
| Video recording |
Not Supported (Can support with CameraFTP VSS) |
| Motion detection |
Supported |
| Continuous recording |
Supported |
| Supported video format |
N/A (.mp4 with CameraFTP VSS) |
| Connection type |
Ethernet cable |
| PoE (Power on Ethernet) |
Yes |
| Indoor / outdoor |
Outdoor |
| Lowest pricing (as of 6/1/2024) |
$110 (Hikvision DS-2CD1383G2-LIUF PoE Outdoor camera) |
Disclaimer: This document is not designed to
replace the product manual from the manufacturer. The information provided is
based on our knowledge of the model Hikvision DS-2CD1383G2-LIUF PoE outdoor network camera with
the latest version Firmware V5.8.4 Build 240613 (as of Aug 2024).
Hikvision has very many camera & NVR models, incl.:
AcuSense Series, ColorVu Series,
DeepinView Series,
Panoramic Series,
Performance Series,
Wireless Series,
Solar-Powered Series,
Value Express Series,
IP PTZ Cameras,
TandemVu Pro Series,
Ultra Series,
Pro Series,
Value Series,
Special Series,
Explosion-Proof and Anti-Corrosion Series,
Explosion-Proof Series,
Anti-Corrosion Series and Network Video Recorders.
We believe the setup interface and steps are similar for all Hikvision network cameras and NVRs.
It may not be accurate or completely up-to-date. We have not fully tested these cameras. Users shall contact the manufacturer
for all camera-related issues and contact us only for CameraFTP-related (cloud
service / FTP) issues.
Please follow the manufacturer's instructions to connect the camera to the network. Many Hikvision outdoor models support PoE.
So you need a PoE switch, or a compatible power adaptor.
You will need to use the manufacturer's software to find the camera's IP address.
After that, you need to launch a browser to access the camera's configuration website.
You might need to download the Hikvision mobile app for the initial configuration. The camera requires you to
set a password for the default user (username: admin). After log in to the camera from a browser,
you will be asked to install the plugin for live viewing the camera.
If you connected the camera to the network, but cannot find the camera's IP address, you can use a PC to find it. The PC must
be connected to the same network (LAN). You can install
CameraFTP VSS software on the PC, then use it to find the camera's IP address.
You will click Add to add a camera in VSS, then scan the local network to find IP cameras in the local network. Please see the screenshots below:
VSS can find the IP address of the camera; however, it may not be able to find the camera brand/model.
If you are not sure which one is the Hikvision camera's IP address, you can check each IP address with a web browser
by entering the URL: http://Camera-IPAddress/.
In the above screenshot, Hikvision camera's IP address is 192.168.1.64,
which is the default IP address if your local network's subnet is 192.168.1.*.
Please note if you don't want to use the PC as a virtual NVR, please use VSS to find the IP address only. Don't click Next in VSS.
If you have multiple Hikvision cameras, you can connect it one by one. You can change the camera's IP address, or enable DHCP. If you do so,
you need to reboot the camera, wait for it to finish booting, then find the IP address again.
See the screen below about how to change the IP address or enable DHCP:
If you want to find your camera's firmware version, or if it is not the latest version and you want to upgrade it,
please look at the screenshot below:
Now you have the camera's IP address. The next step is to open a web browser to access the camera's web interface.
In the browser address bar, type in http://Camera-IPAddress/. If the address is correct, you will see the following screen: (Otherwise, check each IP address in the above list).
Log in with the camera device's username and password; if this is the first time, you will be asked to set a password for the device first.
After login, you might need to install a plug-in for viewing the camera. If so, click the Plug-in icon to download and install it. After that, it will display the camera live view as follows:
You can then click Configuration to config the camera.
Click Configuration, then click Video/Audio, you can access the video stream profile settings screen as shown below.
Note: the camera supports 2 video streams: Main Stream and Sub-stream.

As shown above, the main stream video supports resolutions from 1280P to 4K (8MP).
You can set the resolution based on your service plan. The image-recording resolution will be either the main stream or sub-stream's resolution.
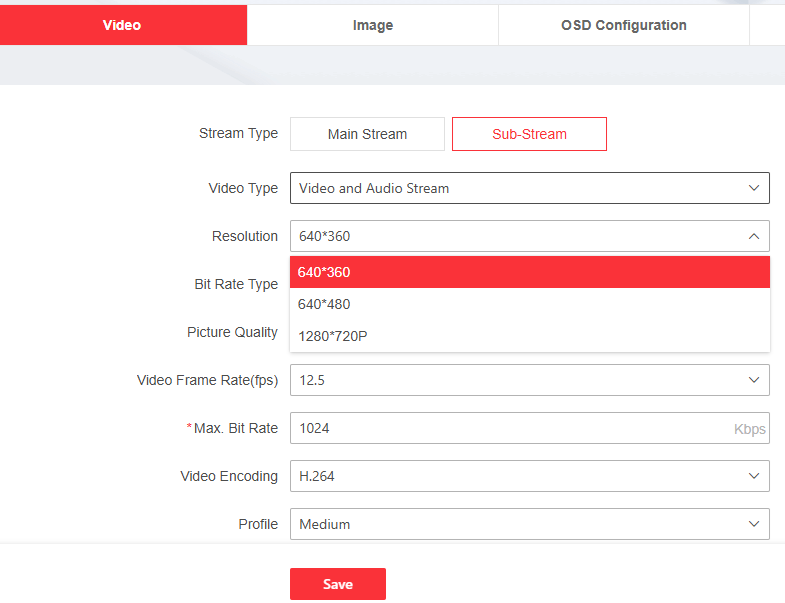
The sub-stream video supports lower resolutions of 640x480 and 1280P.
The parameters to enter are dependent on your subscription plan (camera license). For Hikvision cameras,
the lowest video/image resolution is 640x480 (using the sub-stream).
Please note the image-recording resolution is either the Main Stream or Sub-stream's video resolution. (you can configure which one to use later).
This version of firmware/camera still cannot directly upload video clips. The Video Frame Rate is not relevant to image recording.
(If you plan to use CameraFTP VSS for cloud video recording,
then the source video parameters cannot be lower than your video subscription plan's parameters.
CameraFTP VSS will transcode the video stream and upload video or image based on your subscription plan.)
Similarly, the Max Bit-rate parameter is not relevant to image uploading. (If you use CameraFTP VSS for video recording,
the upload bit rate is dependent on your service plan.)
For image recording, the bit rate is mainly determined by your image upload frequency and image resolution.
At high resolution and upload frequency, image recording requires much higher upload bandwidth.
Please make sure your Internet connection has enough upload bandwidth.
Before configuring the camera's FTP settings, we need to find the FTP information first. Please log in to www.cameraftp.com,
then go to My Cameras page, click Add to add a new camera (folder). It will display the following page:
Enter the camera (folder) name, description and brand/model with a specific subscription or free plan, then click Save Cameras.
The new camera will be created:
Click the Settings icon as shown in the screenshot, it will display the Camera Properties page.
You can find the FTP information that needs to be configured to your camera (or NVR). For the FTP server name,
it is recommended to enter "ftp.cameraftp.com", but if it does not work, you need to check your camera's IP address and DNS settings
or enter the FTP server's IP address 66.220.9.45. Configuring the camera to use DHCP may solve the DNS problem automatically.
For the FTP transfer mode, please select Passive (if such option is available). For the FTP password, we recommend using
the FTP password that is associated with the camera license. This way, each camera uses a different FTP password.
You can also use your CameraFTP account password. If so, you must configure the FTP folder/directory name.
Now, let's configure the FTP information in your camera device. Please note CameraFTP.com cannot automatically configure your device.
We cannot connect to or control your device remotely. So please go back to the camera device's configuration interface.
Click Configuration -> Event -> Alarm Settings -> FTP, you will
see the following screen:
You need to set the following parameters:
- Server address: ftp.cameraftp.com or 66.220.9.45
- Port: 21
- Username, password and confirm password:
The username on CameraFTP.com; you can use your CameraFTP account password,
but it is recommended using the FTP password associated with your camera license (or free license).
You need to log in to www.cameraftp.com and add a camera (folder) first.
- Directory structure: Save in the parent directory
- Parent Directory:
Select Custom, and then enter the camera (folder/directory) name.
- Picture Filing Interval:
Select 1. It means the camera will create a new subfolder and save images to it every day.
- Upload Picture:
Please enable it. You can click Test to test the FTP settings.
Note: the camera will not start
uploading yet; you need to finish other configuration steps.
Please click Save to save the changes. Then click Test to check if it works. If it does not work, please verify
the information, and check if the camera can connect to the Internet. Please also verify that your router and ISP do not
block FTP. You can test it with any popular FTP client program, such as FileZilla.
If it works fine, then it means the camera can upload footage to CameraFTP cloud. However, you still need to configure other steps for the camera
to actually upload footage to CameraFTP.
If you ordered a motion triggered recording plan, then
you must configure motion detection with your camera. Click Configuration -> Event -> Event and Detection --> Motion Detection.
You will see the screen as shown below:
Enable Motion Detection. You can also set motion detection settings based on your needs,
e.g. draw a motion detection area in Area Settings; set the sensitivity level, detect human and vehicle, etc.
It is a camera-specific feature.
You need to set Motion Detection Arming Schedule. Click "Arming Schedule", you will see the screen as follows:
Usually, you will select all time (the default) as shown in the above screenshot. Click OK to save the schedule info.
Lastly, you need to configure the Linkage Method, which means what action(s) to take if a motion event is detected.
In "Linkage Method" section, you will enable "Upload to FTP/Memory Card/NAS". For Recording Linkage, check "Select All".
( If FTP does not work for some rare reasons, you can also enable "Send Email" to upload images using SMTP. )
This camera can only upload image snapshots and not video
clips. CameraFTP has viewer apps that can play the recorded image
snapshots like video clips. If you ordered a video-recording plan, you need to:
(1) Order a new image or timelapse recording plan, then cancel the old video-recording plan;
or
(2) Use CameraFTP VSS on a PC.
If you use VSS, then please do not configure FTP/SMTP in the camera. VSS can upload video clips to CameraFTP.
The snapshot image resolution is set in the Video Stream Profile Settings (The resolution of the Main Stream or Sub-Stream video).
If you ordered a "continuous image recording" or timelapse recording plan, you
need to set the Capture Schedule. Click Configuration -> Storage -> Schedule Settings -> Picture Capture. It will display
the screen as shown below:
For the Capture Schedule, usually you want to select all time (the default setting).
Capture Parameters for Continuous or Event/Motion-triggered Image Recording:
At the bottom, you can choose Main Stream or Sub-Stream for the stream type.
If you ordered a high-resolution (>=1280x720) image recording or timelapse recording plan, then select Main Stream.
If you ordered a low-resolution (<=1280x720) image recording plan, then select Sub-Stream.
You must save it first, then it will update the Resolution dropdown. Note the image resolution is
the same as either the Main Stream or Sub-Stream video resolution based on your selected stream type.
If you ordered a Continuous Image Recording / Timelapse Recording plan, then configure the "Continuous" section only.
- Scheduled Capture: Enable it
- Picture Format: JPEG
- Resolution: Select one based on your service plan
- Picture Quality: Medium
- Interval: x seconds (based on your subscription plan)
If you ordered a motion-triggered image recording plan, then only configure the "Event Triggering" section.
- Event-Triggered Capture: Enable it
Click Save to save the settings.
You have just finished configuring your IP camera or NVR. To make sure it works fine, you can reboot the camera and check if it still works. If you need to make
changes, you can repeat the above steps and make changes as needed. It is very important to remember the camera device's password.
If you need to configure a Hikvision NVR/DVR, the steps are similar. Initially, you can treat the NVR/DVR as a single IP camera.
You just need to make sure the cameras' recording parameters are based on your service plan, and order enough camera licenses.
The NVR will upload all images to one camera folder. Please send an email to CameraFTP support. We will configure the server to
automatically create multiple camera folders for the NVR.
After your camera is setup, you can visit www.cameraftp.com to monitor or
play back your recorded footage from anywhere. You can also download
CameraFTP Viewer App for iOS, Android and Windows (and Mac).
Note: Hikvision cameras cannot upload video clips to FTP server directly. To upload video clips, you can use CameraFTP VSS on a PC.
These cameras are compatible with VSS-based Live View, Cloud Recording and Local Recording.
If you use VSS for video recording, it is important to set the correct video frame rate and bit rate in Video Stream Profile Settings.
Cannot get it to work? Please read our
Trouble-shooting Guide.