Configure Reolink RLC-810, 811, 823, 843, 1224, CX410, PoE / Duo IP Cameras or NVRs for Cloud Recording, Backup, Monitoring and Playback
Contents
Introduction
Step 1: Connect the Camera to the Network and Find Its IP Address
1.1 Connect the Camera to the Network
1.2 Find the Camera's IP Address
Step 2: Configure the Camera with the Web-based Configuration Tool
2.1 Setup Video / Image Resolution, Frame Rate and Bit Rate
Step 3. Configure the FTP/SMTP Settings
3.1 Configure the SMTP Settings
Step 4. Configure Motion or Continuous Recording Options
5. CameraFTP Viewer
Reolink is a very popular IP camera and NVR device manufacturer. They make high-resolution outdoor / dome cameras, and NVRs.
These devices have high-end SPECs but are sold for low prices.
Reolink 8MP (4K) and 12MP PoE outdoor cameras are widely used for construction
timelapse recording.
The main features include:
- - High resolution 4K (8MP) video at 25 fps.
- - H.264 / H.265 video compression, can upload .MP4 video clips.
- - Supports both image / timelapse recording and video recording; can directly upload footage to Cloud.
- - Supports standard protocols like FTP, SMTP, RTSP and ONVIF; Compatible with CameraFTP VSS software.
Basic camera information
| Video / image resolution |
4K (8MP), 2560x1440(4MP),2304x1296(3MP), 900x512, 640x360 |
| Audio recording |
Supported (range: 15 feet) |
| Image upload frequency |
Up to 1 image/2s. |
| Video frame rate |
1,2,3,...,30 fps |
| Night-vision |
66 to 100 feet |
| Image / timelapse recording |
Supported |
| Video clip recording |
Supported |
| Motion detection |
Yes |
| Continuous recording |
Yes. |
| Supported video format |
.MP4 |
| Connection type |
Wi-Fi + wired; or PoE |
| PoE (Power on Ethernet) |
Yes |
| Indoor / outdoor |
Outdoor or Dome |
| Lowest pricing (as of 8/10/2024) |
$79.99 |
| CameraFTP Editor's Rating |
4/5: Great for timelapse recording. Supports high resolution image recording from 3MP to 8M (some models support 12MP);
also supports lower image resolution of 900x512 and 640x480.
There are a few issues with cloud video recording:
(1) Video clip file size must be at least 10MB (No good reason not to support smaller files).
(2) Does not support popular video resolutions like 720P and 1080P. It supports video resolution of 640x480, 900x512 and 3MP, 4MP and 8MP.
If you use CameraFTP VSS, then you can record video/image of any resolution or frame rate.
|
Disclaimer: This document is not designed to
replace the product manual from the manufacturer. The information provided is
based on our knowledge of the model "Reolink RLC-811A PoE Outdoor 8MP Network Camera". We believe the information
is also applicable to Reolink RLC-810A, RLC-823S1, RLC-1224A, RLC-843A, RLC-1240A, RLC-843A, RLC-833A
RLC-811WA, RLC-810WA, RLC-843WA, RLC-510WA, E1 Outdoor Pro, CX-410W, Reolink Duo PoE,
RLC-1212A, CX-810, RLC-840A, RLC-820A, RLC-540A, RLC-520A, RLC-823A, RLC-830A, RLC-1212A, RLC-1224A, RLC1240A and NVRs, etc.
The information may not be accurate or up-to-date. Users shall contact the
manufacturer for all camera-related issues and contact us only for
CameraFTP-related (cloud service / FTP) issues.
The first 2 steps are camera-related. You can use tools and documentation from the manufacturer to connect the device to the network.
If the camera is already connected to the network and you know its IP address, then you can skip the 2 steps.
For a wired/PoE camera, you just need to connect it to a network router / switch with an Ethernet cable. For a Wi-Fi camera,
you can connect the network cable first and then use the web-based configuration tool to configure Wi-Fi later; you can also use
the mobile app provided by the manufacturer to connect the camera to the Wi-Fi router directly.
Please refer to the product manual for detailed information.
Usually you will use Reolink's mobile app to configure the camera and set or get the IP address. You can also use Reolink's
desktop software to find the camera's IP address. Alternatively, you can use
CameraFTP VSS software
to find the camera's IP address. Launch CameraFTP VSS, click Add -> IP Camera -> Find IP Cameras in Local Network, it will automatically
scan the local network for connected IP cameras.
As shown in the screenshot below, the device name is a generic Reolink name. If the camera's ONVIF protocol is enabled, then it can display
the camera's model info (or internal code name).
Note: Most Reolink IP cameras/NVRs are compatible with CameraFTP VSS. You can use VSS as a Cloud NVR, which is easier and has more and better
features than an NVR. In this document, we only use VSS to find the camera's IP address. So don't click Next in VSS.
Now you have the camera's IP address. Open a web browser and enter the following URL:
http://IP_ADDRESS/
It might display an SSL certificate error. You can safely ignore it and continue. The device's
default username is admin, and password is empty (no password). You need to
change the password.
After you log in to the camera, you will see the live view screen as follows:
Click the Gear (or Settings) icon on the top-right corner, it will display the Settings screen. Click Camera, then click Stream,
you can configure the video stream parameters as shown below:
The Clear Stream is a high-resolution video stream optimized for high quality Image/Timelapse recording. (Other IP cameras call it Main Stream).
It supports 8MP, 4MP and 3MP video resolutions. The frame rate can be set from 2 to 25.
For the max bit rate, it supports 4-8Mbps for 4K (8MP) video stream;
For lower resolution 3MP and 4MP videos, it can be set to 1, 1.5, 2, 3, 4, 5Mbps.
Note: If you change the video resolution, the setting is applied automatically without the Save button. The
camera might automatically reboot and you will need to log in again.
Scroll down, you can configure the Fluent Stream video. (Other IP cameras usually call it sub-stream).
Please see the screenshot below:
The fluent stream video only supports one resolution of 640x360. You can set the frame rate
to 15, 10, 7 or 4. The bit rate supports: 64, 128, 160, 192, 256 and 384Kbps.
The Fluent stream is a low resolution video stream optimized for cloud recording and viewing.
For video recording, the selected video stream resolution and frame rate should be based on the plan you subscribed to.
( The video frame rate and bit rate are not applicable to image / timelapse recording. )
The Bit Rate is for video recording only. Higher video resolution / frame rate usually requires higher bit rate.
Setting it too high may slow down your network or cause failed uploads; setting it
too low will affect the video quality. You can use our bandwidth calculator to
estimate the bandwidth. Visit www.cameraftp.com,
click Pricing, and then customize a service plan. See the screenshot below.
Note for estimating the bandwidth, Number of Cameras should be set to 1.
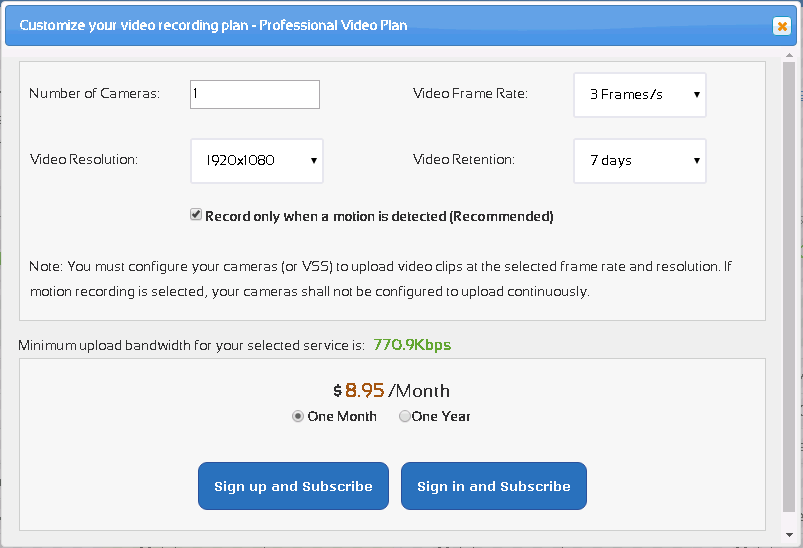
For the video plan of 1920x1080, 3 frames/s, the estimated bandwidth is 770Kbps.
you can set it to a value smaller than 1024Kbps.
If you cannot set a low video resolution, then you should try to set a low bit-rate if possible.
Click Ok to save the settings.
Click Surveillance -> FTP,
you can see the screen as follows.
Enable FTP, then expand the FTP Settings, you can see the following screen:
If you don't already have an account on
CameraFTP, please open a different web browser window/tab, visit
www.cameraftp.com and
sign up for a free account. CameraFTP offers the basic service for free. It also includes 3-day free trial of our cloud recording service.
Assuming you have a CameraFTP account, please log in to www.cameraftp.com website. Go to My Cameras page, click Add to add a camera. Please see the screenshot below:
If you have multiple available camera licenses, please select a correct license to use with this camera.
Enter the camera (folder) name, description and model info as shown in the above screenshot. Click Save. It will add a camera folder to your CameraFTP account.
Go back to My Cameras page by clicking My Cameras, you will see the new camera folder as follows:
Click the Settings icon below the camera thumbnail, it will display the Camera Properties page as follows: (you might need to scroll down)
Now, go back to your camera device's configuration page (scroll up/down as needed), then enter the FTP info as follows:
Note the interface is slightly different if you selected Image in the Upload dropdown.
If you ordered an image or timelapse recording plan, then you need to select Image.
Please see the screen below:
For the resolution, it supports Clear, Fluent and Balanced. "Clear" is for high-resolution recording at up to 8MP.
Fluent is for 640x360. "Balanced" is for 896x512 (roughly 800x600).
For the Interval, you can select an interval from the Dropdown, or select Custom and then enter a time. It should be based on your subscription plan. If you ordered a
plan with 1 image / minute, then the Interval should be 1 minute.
Reolink IP cameras and NVRs also support SMTP-based uploading.
It is similar to FTP, but with slightly different features.
If FTP/FTPS is blocked by your ISP, then you can try SMTP. The SMTP feature can upload low-resolution videos at the same resolution and frame rate of the Fluent Stream video.
(Note: the FTP feature can upload videos at the resolutions of Clear, Fluent or Balanced video streams; but the frame rate is fixed to 25fps)
Reolink solar/battery-powered cameras usually don't support FTP;
but they support SMTP (email). In this case, you can use SMTP-based uploading.
For any one camera, please do not configure both FTP and SMTP.
To configure SMTP-based uploading, first, we need to get the SMTP information from CameraFTP.com website. Similar to FTP, we need to log in to www.cameraftp.com,
add a camera (folder), then go to My Cameras page, click the Settings icon below the camera thumbnail. It will display the camera properties page. Scroll down the page
then you can see the SMTP settings as shown below:
Go back to Reolink camera's configuration page, click Surveillance -> Email, you will see the following screen:
Enable Email Alerts, and then expand Email Settings as shown above, you will see the following screen:
Enter the SMTP information from the camera properties page on CameraFTP.com.
For the SMTP server, you need to select Custom.
Then you can enter our SMTP server name c.drivehq.com.
For the Sender Name, you can enter the same Sender (Email) Address.
As explained in the above screenshot:
For video recording, it can upload video clips of 30 seconds or 1 minute.
The video resolution and frame rate are configured to be the same as the Fluent Stream, which is
640x360, at 4, 7, 10 or 15 fps.
For regular surveillance, the SMTP method might be better for many users as it
requires little upload bandwidth. The cost is also very low.
For Image Recording, the image resolution is the same as the Clear Stream video resolution.
The upload interval can be 30 seconds, 1, 5, 10, 30 minutes.
It is great for timelapse recording. For regular surveillance,
the upload frequency is a little too low. The FTP method is better.
If you ordered a continuous-recording plan, you need to set the "Timer Schedule" in the FTP settings (or SMTP Settings if you configured the SMTP-based uploading).
Scroll down the FTP settings page, you will see:
For continuous recording, usually you need to select all time slots. For timelapse recording, you can select the day time only. This way,
the camera will not record dark images. Click Save to save settings.
If you ordered a motion-triggered recording plan, then you need to set the "Alarm Schedule" in the FTP Settings. Please see below:
Please check "Any Motion", or if you want to receive fewer false alarms, you can selectively check Person, Vehicle, Pet. Click Save to save it.
You also need to configure the camera's motion detection settings. Please see the screenshot below:
The settings here is camera-specific. The default settings is usually fine.
You have just finished configuring your IP camera or NVR!
If you need to make changes, you can run the CameraFTP Virtual Security System
program again to find the camera's IP address, and
then access the camera's web-based Configuration pages.
If you need to configure a Reolink NVR/DVR or Reolink Duo (with two lens/cameras in one camera device), the steps are similar.
Initially, you can treat the NVR/DVR (or Reolink Duo) as a single IP camera.
You just need to make sure the cameras' recording parameters are based on your service plan, and order enough camera licenses.
The NVR will upload all footage to one camera folder. Please send an email to CameraFTP support. We will configure the cloud server to
automatically create multiple camera folders for the NVR (or Reolink Duo).
After your camera is setup, you can
log in to www.cameraftp.com to view
or play back your camera footage from anywhere. You can also download
CameraFTP Viewer app for iOS, Android and Windows.
Note: Reolink IP camera is compatible with VSS-based Live View, Cloud Recording and Local Recording.
You can use VSS as a cloud-recording NVR, which requires a PC. If you want to use VSS with this camera.
Cannot get it to work? Please read our
Trouble-shooting Guide.